OAuth 2.0 (OAuth) provides a way for your app users to grant limited access to their Smartsheet resources. Here, we demonstrate registering apps to use OAuth and implementing an OAuth flow with your apps.
Note: The Smartsheet SDKs also support OAuth 2.0.
Developer Tools is a Smartsheet user interface for registering client applications that use OAuth to access Smartsheet user resources with the user's consent. Here's how to regsiter for Developer Tools.
Designate a Smartsheet account for using OAuth with your apps.
Tip: A best practice is to use an additional Smartsheet account (a service account) that you don't personally use in the Smartsheet application.
Go to the Developer Tools Registration page.
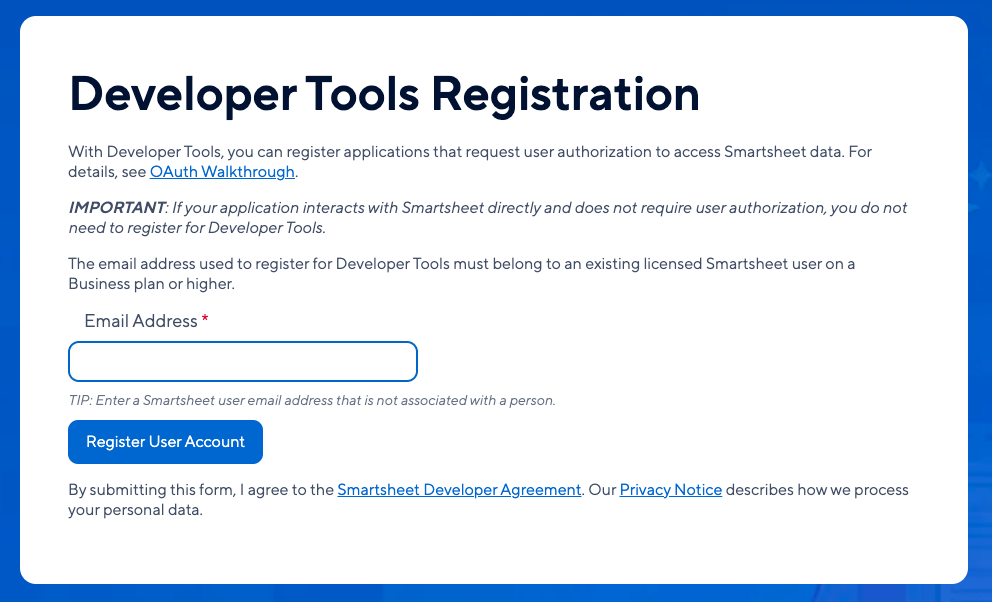
In the Developer Tools Registration page, enter the email address of a user account to associate with your apps.
Read the Smartsheet Developer Agreement. If you agree and are ready to register your user, click Register User Account.
A developer tools registration confirmation message appears.
Upon accepting your request, Smartsheet activates the Developer Tools user interface for the user account.
Note: If Smartsheet denies your request, consult with your Customer Success Manager.
A developer profile is a prerequisite for registering apps. Here's how to create one:
In the Smartsheet application, select your Account icon in the lower-left corner
and then select Developer Tools.... The Developer Tools window appears.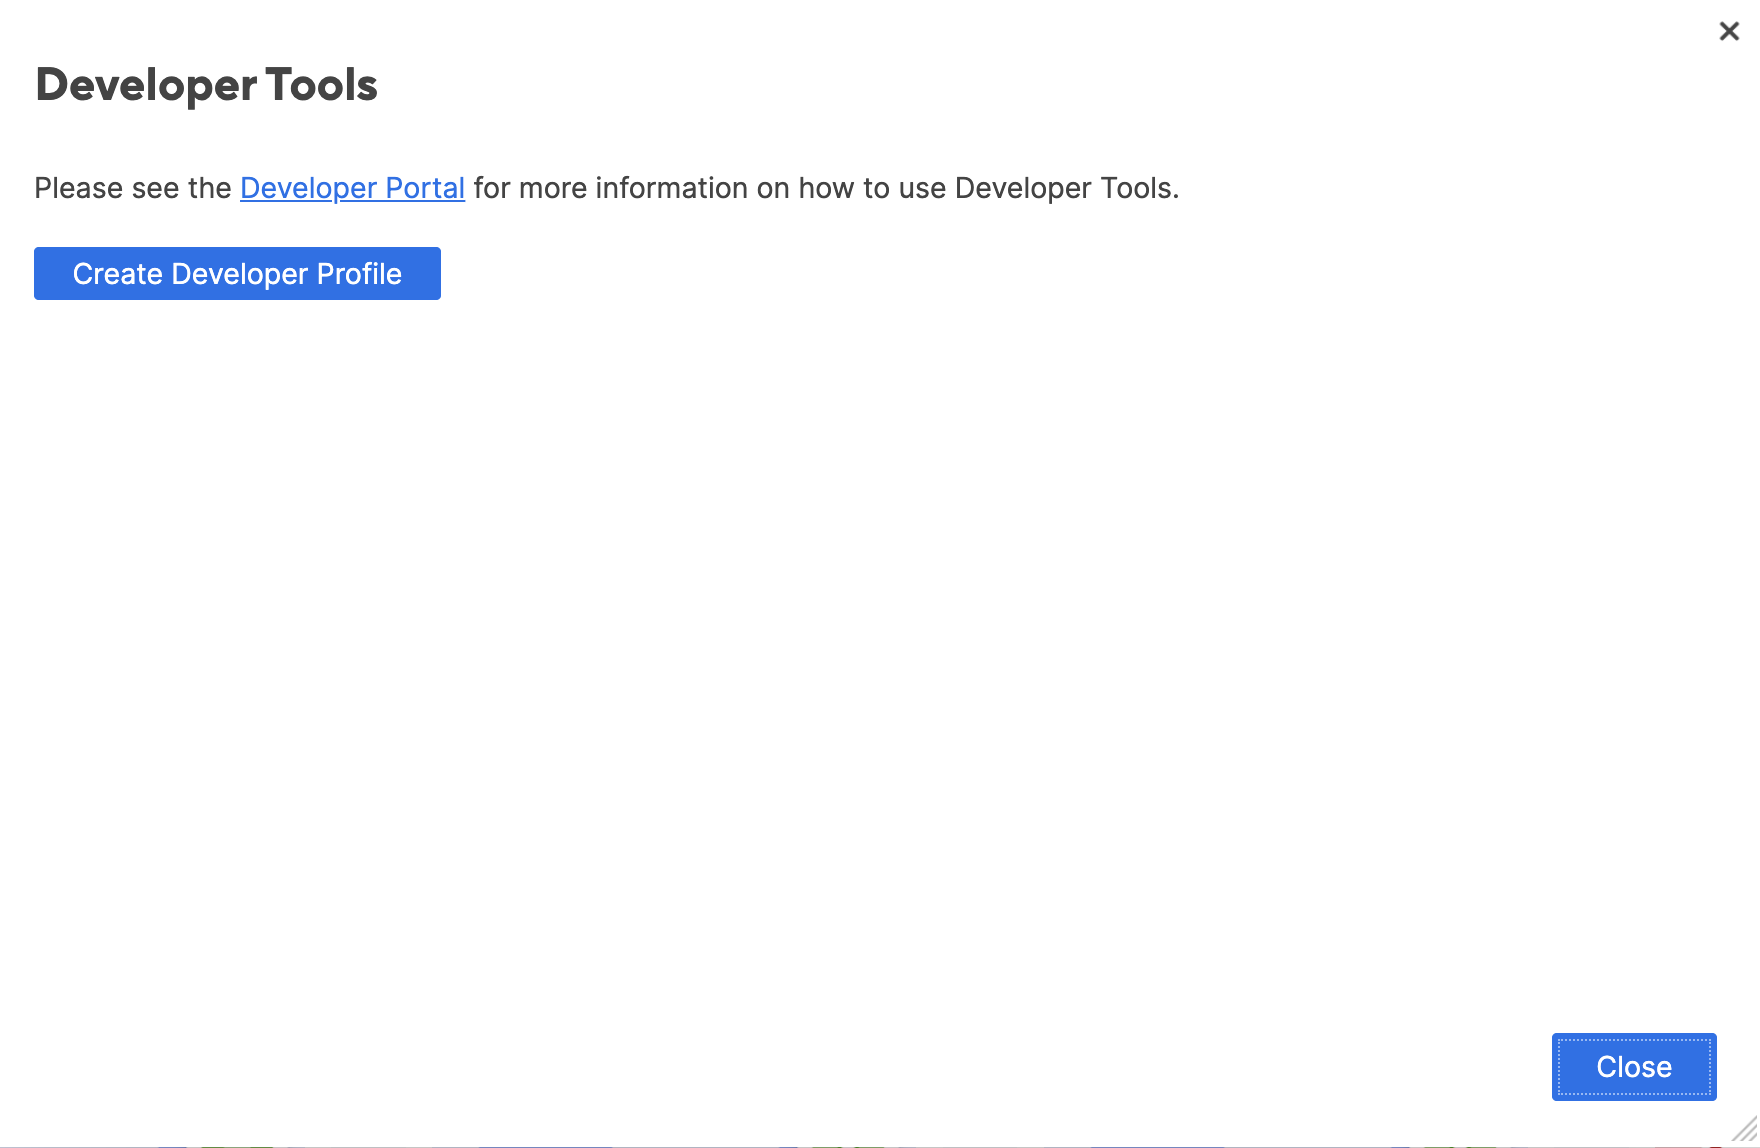
Click Create Developer Profile. The Developer Profile form appears.
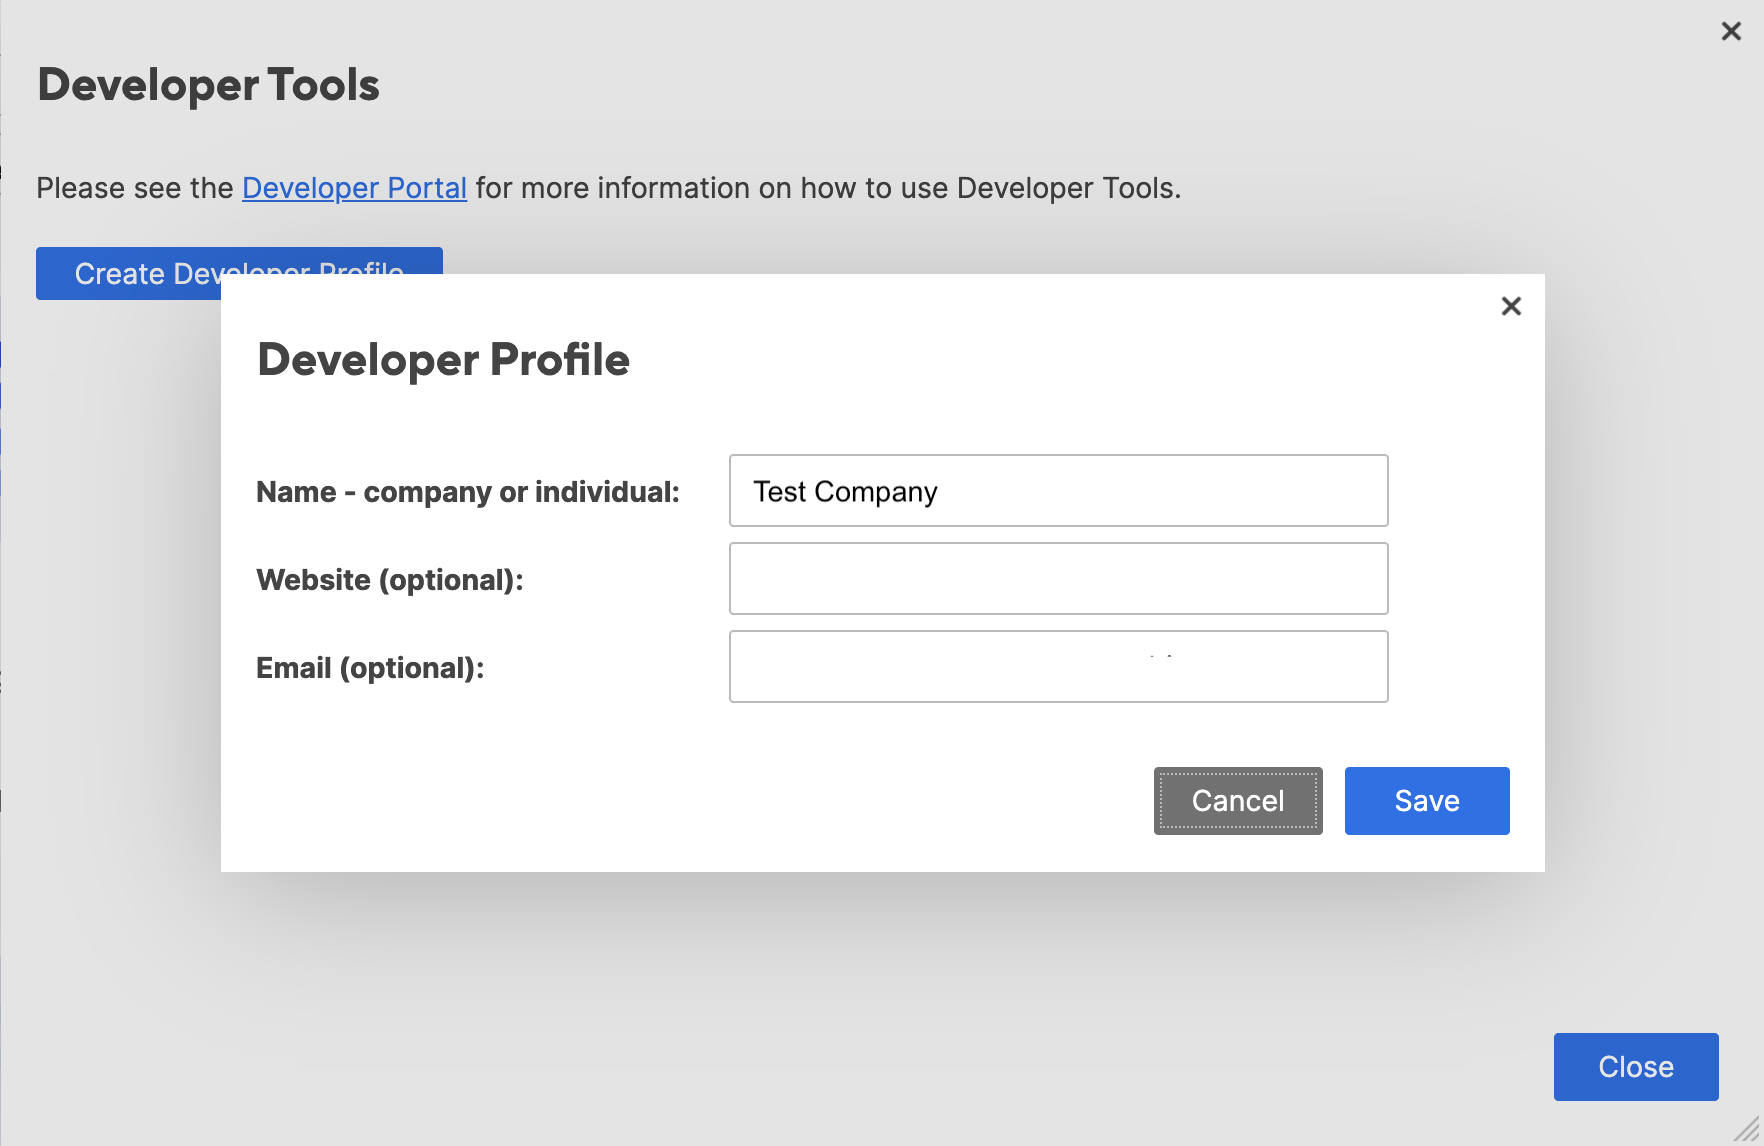
In the Developer Profile form, name your profile. Optionally, you can also enter a website URL and an email address to associate with your profile.
Save your profile.
Now, you have a developer profile with which to register apps that use OAuth.
Here's how you register an app to access Smartsheet via OAuth.
Go to the Developer Tools, if you're not already there.
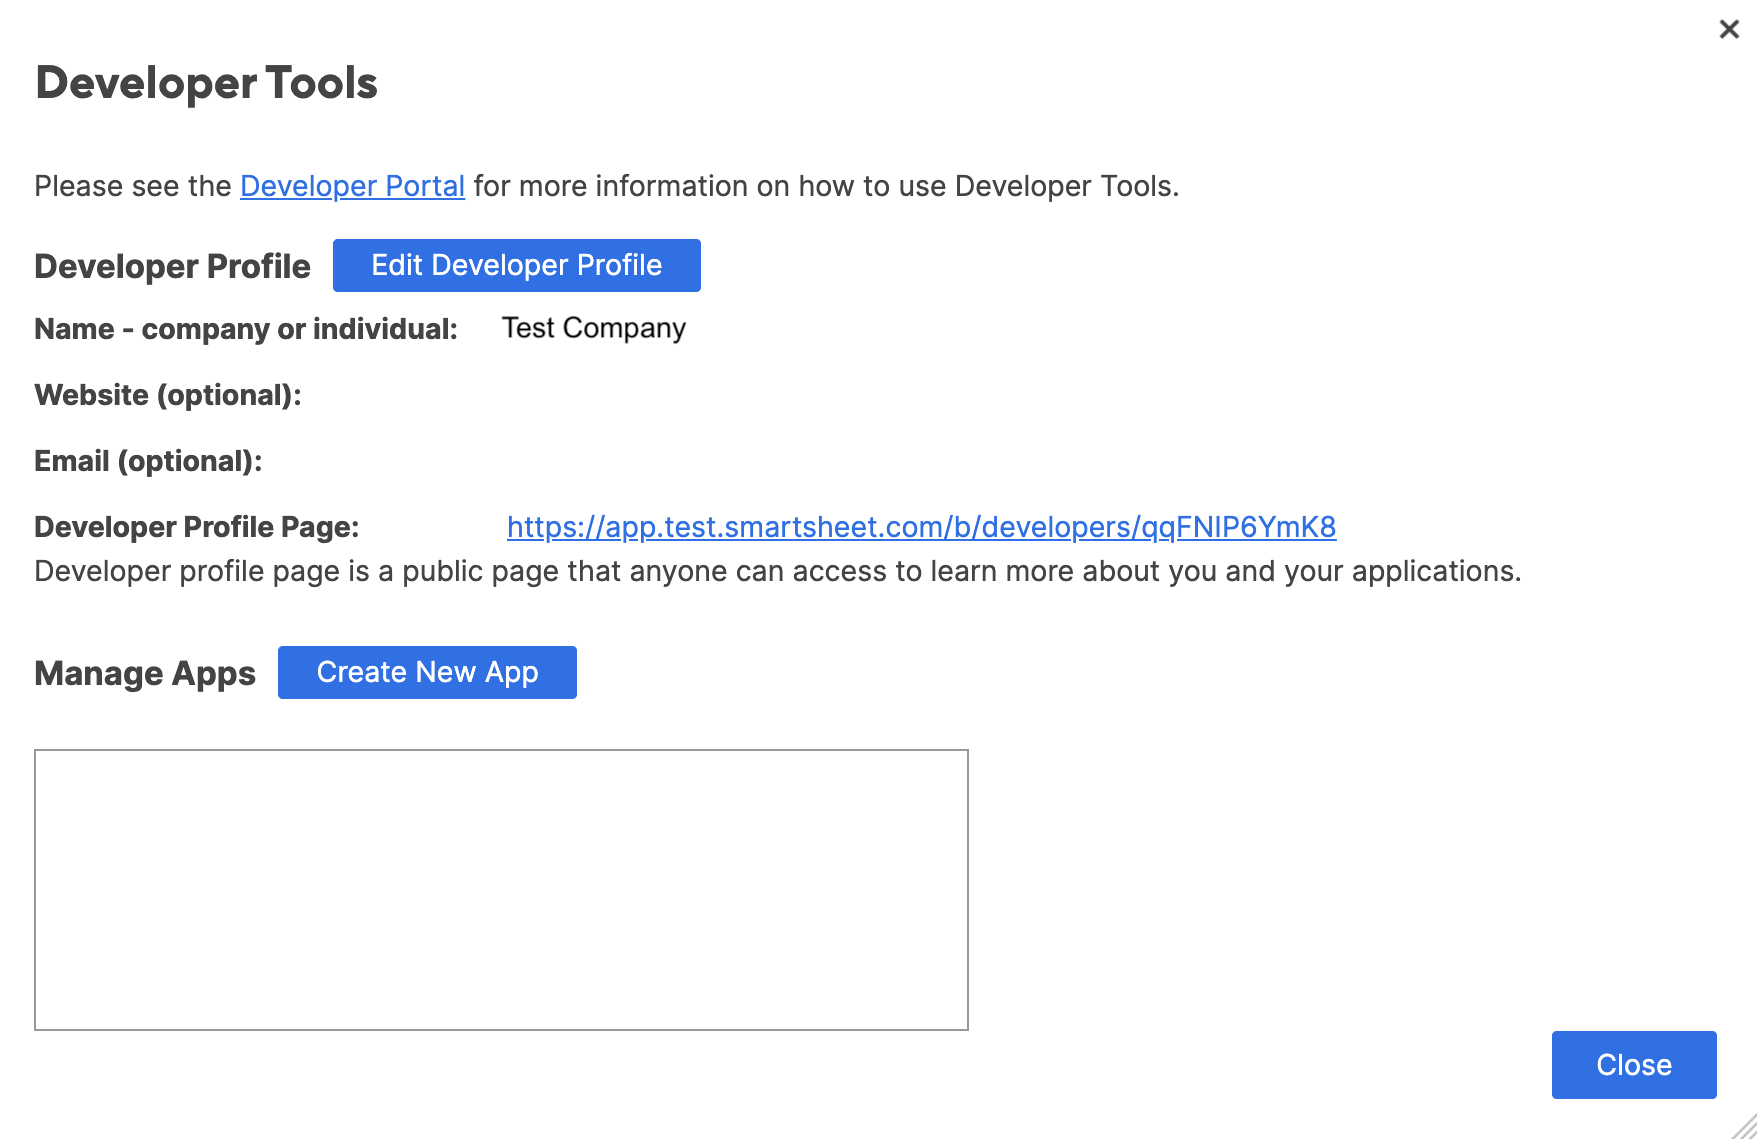
Click Create New App. The Create New App form appears.
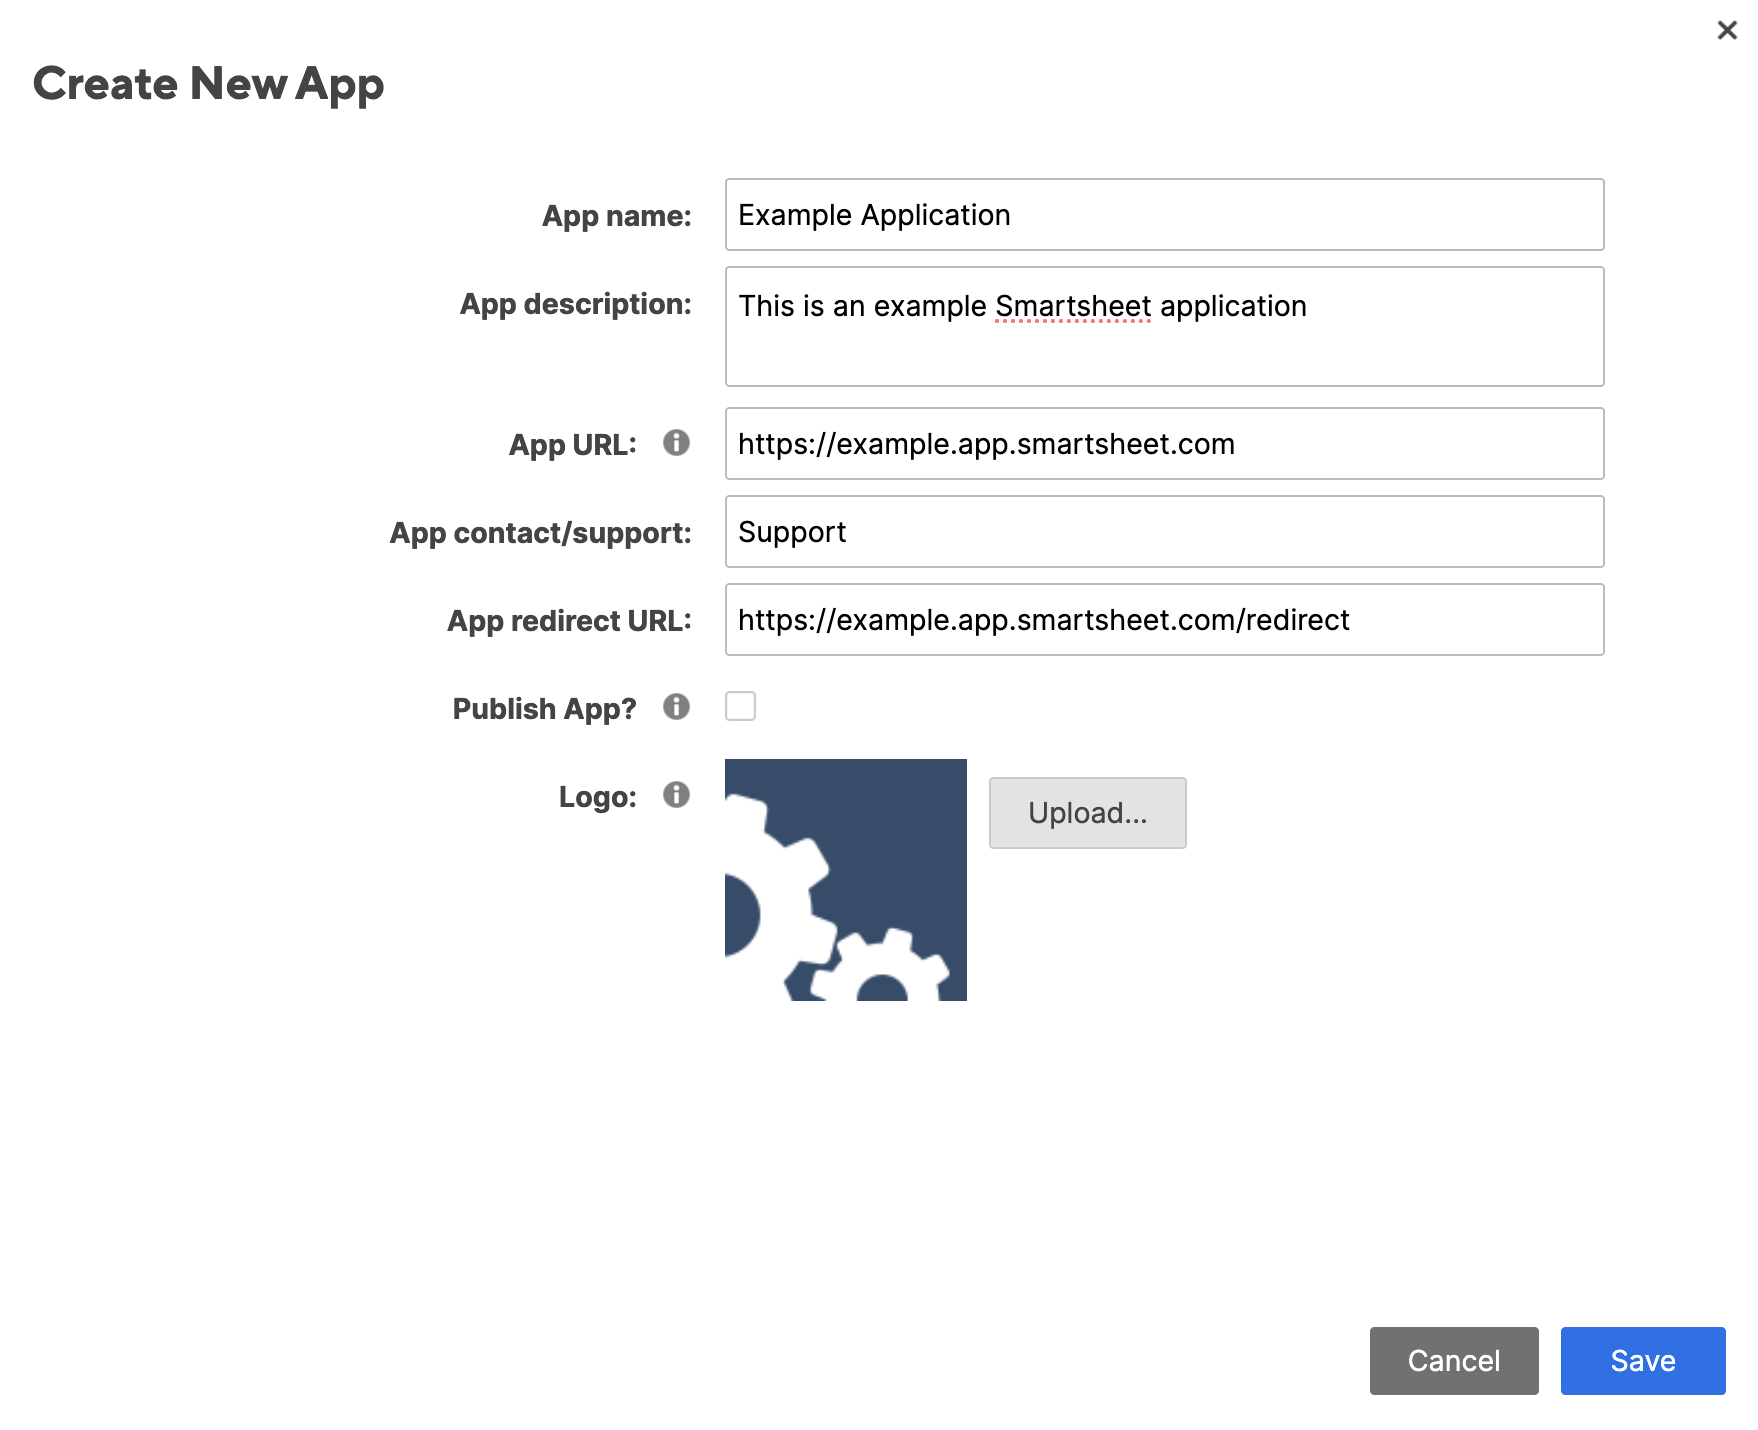
In the Create New App form, enter the following information:
App name: A name to identify your app to the user
App description: A brief description of your app
App URL: The URL that launches your app, or the landing page if not a web app
App contact/support: Support information
App redirect URL: Also known as a callback URL. The URL within your application that receives OAuth 2.0 credentials.
Publish App?: If selected, Smartsheet makes your app's profile page publicly available for anyone to learn more about your applications.
Note: When you save the app registration, Smartsheet generates a profile page for it. You can access the App profile page URL if you view the app details in Developer Tools.
Logo: An image to associate with your app.
Click Save to register your app. A window appears, confirming your newly created app registration and the App client ID and App secret.
Note: You'll use the client ID and secret in the OAuth flow steps. You can note them now or look them up again in the Developer Tools pages.
You're ready to implement an OAuth flow for your newly registered app.
Your app must implement an OAuth flow to retrieve an access token it can use to access Smartsheet data on behalf of an end user. Here,
The following diagram provides an overview of the OAuth flow:
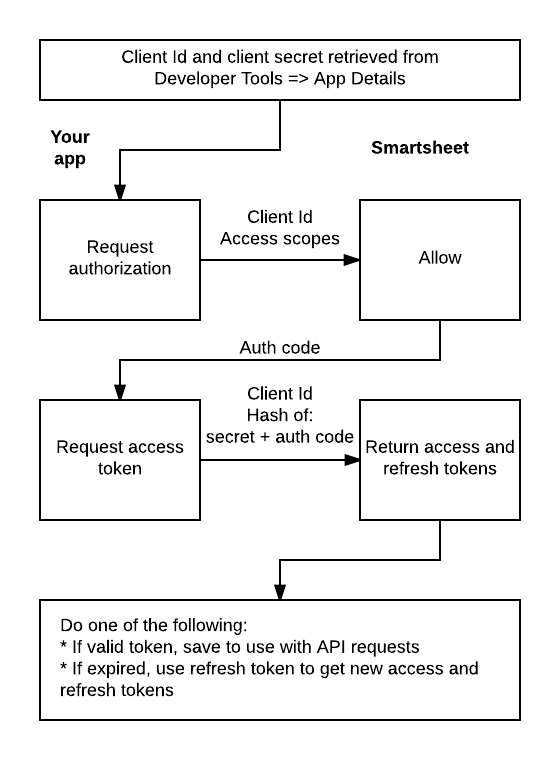
Note: OAuth flow require HTTPS.
Access scopes specify the types of resources your app needs to access and the types of actions to perform on those resources. Your app will present these access scopes to the user and request the user's consent to operate on the applicable resources on the user's behalf.
You must determine the access scopes your app needs.
Note: Access scopes don't override existing access-level restrictions (that is, sharing permissions).
For example, having the access scope of
WRITE_SHEETSdoesn't allow your app to update a sheet on which the user has onlyVIEWERaccess level permissions.
Here are the access scopes:
| Access Scope | Description |
|---|---|
| ADMIN_SHEETS | Modify sheet structure, including column definition, publish state, and more. |
| ADMIN_SIGHTS | Modify Sight/dashboard structure. |
| ADMIN_USERS | Add and remove users from your Smartsheet organization account; create groups and manage seat types. |
| ADMIN_WEBHOOKS | Create, delete, and update webhooks; get all webhooks; reset shared secrets. |
| ADMIN_WORKSPACES | Create and manage workspaces and folders, and their shares. |
| CREATE_SHEETS | Create new sheets. |
| CREATE_SIGHTS | Create new Sights/dashboards. |
| DELETE_SHEETS | Delete sheets. |
| DELETE_SIGHTS | Delete Sights/dashboards. |
| READ_CONTACTS | Retrieve contacts. |
| READ_EVENTS | Retrieve events. |
| READ_SHEETS | Read all sheet data, including attachments, discussions, and cell data. |
| READ_SIGHTS | Read all Sight/dashboard data. |
| READ_USERS | Retrieve users and groups for your Smartsheet organization account. |
| SHARE_SHEETS | Share sheets, including sending sheets as attachments. |
| SHARE_SIGHTS | Share Sights/dashboards. |
| WRITE_SHEETS | Insert and modify sheet data, including attachments, discussions, and cell data. |
You'll specify the access scopes in an authorization request (covered next).
Important: Your authorization code request must specify all the access scopes your app needs.
You must request at least one access scope for your app, but should only request necessary ones.
Note: Regardless of the access scopes you specify, your app will be able to call the Get current user operation using a valid access token that you obtain using the authorization code you request next.
In your app, you must send a request for an authorization code by redirecting the end user's browser to Smartsheet's authorization endpoint. You can do this by executing the following operation.
Operation:
GET https://app.smartsheet.com/b/authorize
Here are the operation parameters:
| Parameter | Description |
|---|---|
client_id | Required. The client ID you obtained when you registered your app. |
response_type | Required. Indicates whether the endpoint returns an authorization code. Set this to "code". |
scope | Required. Space-delimited list of access scopes to which you are asking the user to grant access. For example, in scope=READ_SHEETS%20WRITE_SHEETS.Important: %20 is the URL encoding for a space character between the two access scopes. Note: If you simply need to validate that the user has a Smartsheet account, you don't need to specify the scope query parameter in your request. |
state | Optional. An arbitrary string of your choosing that is returned to your app; a successful round-trip of this string helps ensure that your app initiated the request. |
For example,
https://app.smartsheet.com/b/authorize?response_type=code&client_id=dheu3dmkd32fhxme&scope=READ_SHEETS%20WRITE_SHEETS&state=MY_STATE
Smartsheet generates the consent page based on a combination of the information you registered for your app and the parameters you send with the authorization request.
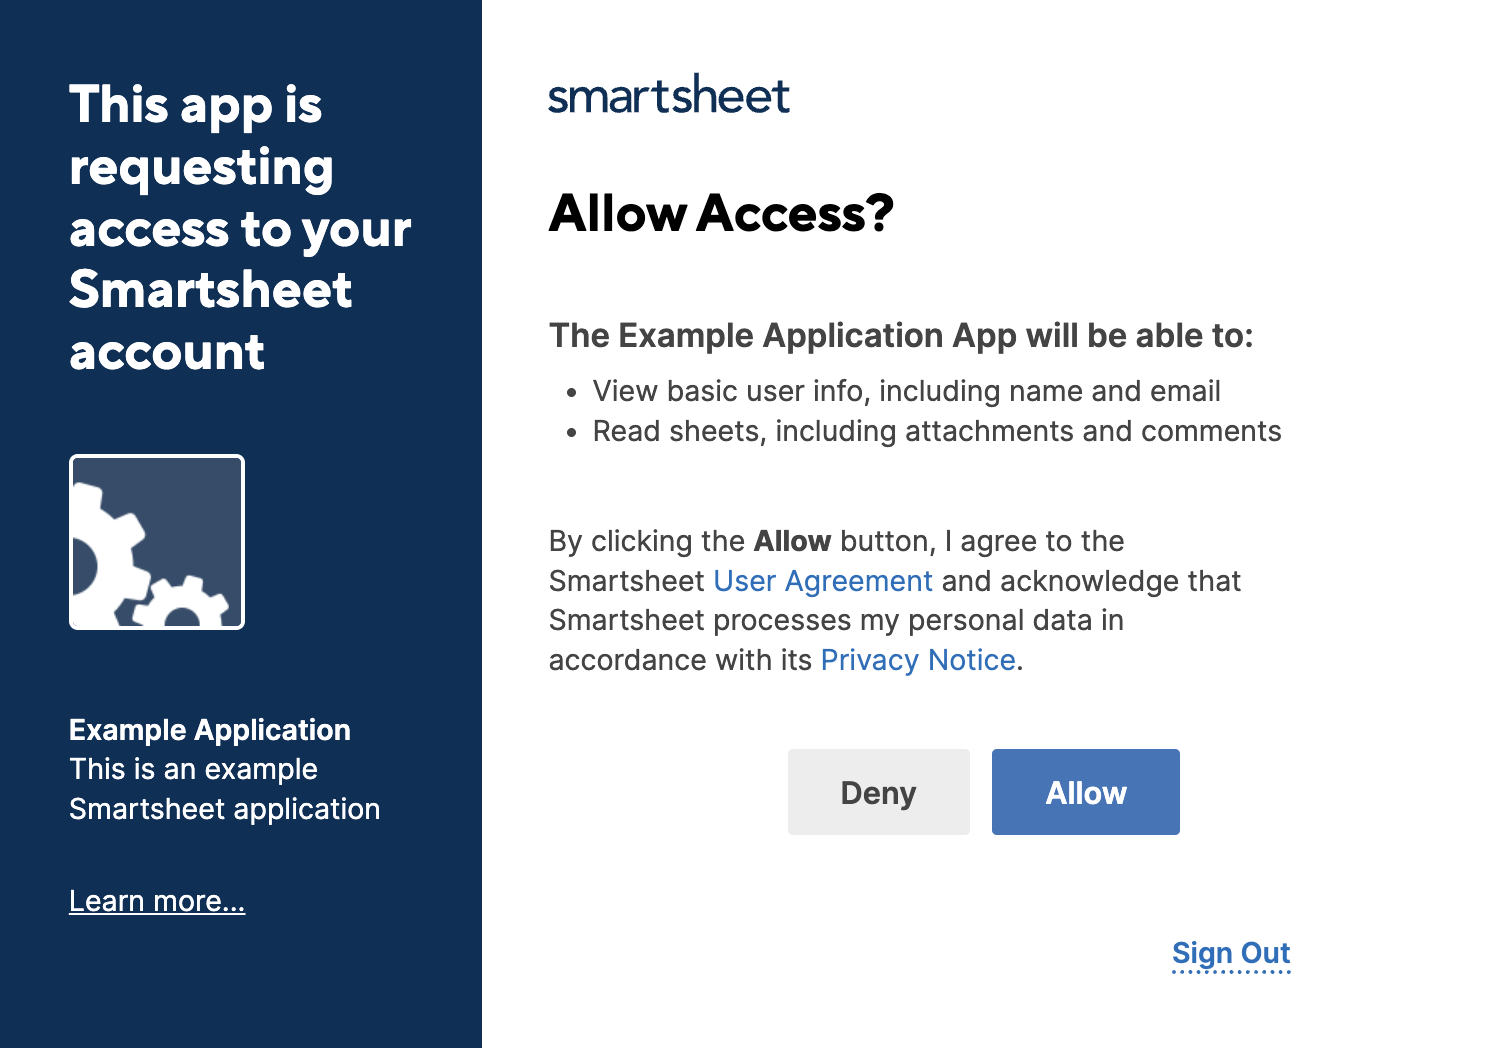
Note: If the user isn't signed in to Smartsheet, the redirect first takes the user to a sign in page. After the user signs in, Smartsheet displays the consent page.
At this point, the user can allow or deny your app access their Smartsheet account.
If the user clicks Allow, Smartsheet redirects the user's browser to your redirect URL and includes the following parameters:
| Parameters | Description |
|---|---|
code | Authorization code required to obtain access token. For example, sample6p9qisx6a. |
expires_in | Number of milliseconds the code remains valid once issued; this is currently 599135 milliseconds, or approximately 10 minutes--you must obtain an access token within that time. |
state | The same value for state that you sent when you requested the authorization code. Your app can verify that the state value matches what you sent to the user when you requested the authorization code. |
Note: The state value helps you determine that the response came from the user and not a malicious script. If the values don't match, you should reject the response.
For error conditions, see the list of OAuth Error Types.
If you want to start making requests on behalf of the user, you can skip ahead to get an access token. Otherwise, read on to learn what happens if the user denies authorization.
If the user clicks Deny, Smartsheet redirects the user's browser to the redirect URL with the following parameters:
| Attribute | Description |
|---|---|
error | "access_denied" |
state | The same value for state that you sent when you requested the authorization code. |
When the user grants you authorization, you can exchange the authorization code that you received in the callback URL for an access token.
Important: The authorization code expires after 599135 milliseconds.
You can request an access token by calling POST /token with grant_type=authorization_code".
Here's an example of an unencrypted request:
curl https://api.smartsheet.com/2.0/token \
-d 'grant_type=authorization_code&code=YOUR_AUTHORIZATION_CODE&client_id=YOUR_CLIENT_ID&client_secret=YOUR_CLIENT_SECRET' \
-X POST| Parameter | Description |
|---|---|
grant_type | "authorization_code" declares that you're requesting an access token via the authorization code flow. |
code | YOUR_AUTHORIZATION_CODE is a placeholder for the authorization code you received in the callback URL. |
client_id | YOUR_CLIENT_ID is a placeholder for your app's client ID. |
client_secret | YOUR_CLIENT_SECRET is a placeholder for your app's client secret. |
Important: Instead of submitting the
codeandclient_secretparameters in plain text, you can encrypt them in thehashparameter. See thePOST /tokenreference page for details.
If the access code is valid, the operation responds with an access_token value that you can use to access resources on behalf of the user.
Otherwise, if the code has expired, the operation returns a 401 code.
Note: Access tokens expire after 604799 seconds, which is approximately 7 days.
If the access token expired, you can call POST /token with grant_type=refresh_token" to get a new access token and refresh token.
Here's a typical workflow for using the access tokens in API calls:
Acquire an access and refresh token pair through the OAuth flow (
POST /token+grant_type=authorization_code).Execute requests to the API using the access token.
In time, the access token expires and API requests fail with authorization errors.
Acquire a NEW access and refresh token pair via the refresh token (
POST /token+grant_type=refresh_token+refresh_token=YOUR_REFRESH_TOKEN, replacingYOUR_REFRESH_TOKENwith the refresh token received in step 1).Go back to step 2.
You're operating on the Smartsheet resources on behalf of the user.
Note: For operation details, see the
POST /tokenreference page.
For reference, here are some OAuth-related error types:
| Value | Description |
|---|---|
invalid_client | The client information is invalid. Ensure your client id is correct. |
invalid_grant | The authorization code or refresh token is invalid or expired or the hash value does not match the app secret and/or code. |
invalid_request | The request parameters are invalid or missing. |
invalid_scope | One or more of the requested access scopes is invalid. Please check the list of access scopes. |
unsupported_grant_type | grant_type must equal authorization_code or refresh_token. |
unsupported_response_type | response_type must be set to code. |